Setting Up Vaultwarden: How I Self Hosted Bitwarden for 25 Employees
Every employee at our company needs to connect through the Omnissa Horizon client to access their personal VM. Each VM has its own login, and inside that VM there are more logins for the software they use daily. So really, every person needs three separate sets of credentials just to start their workday.
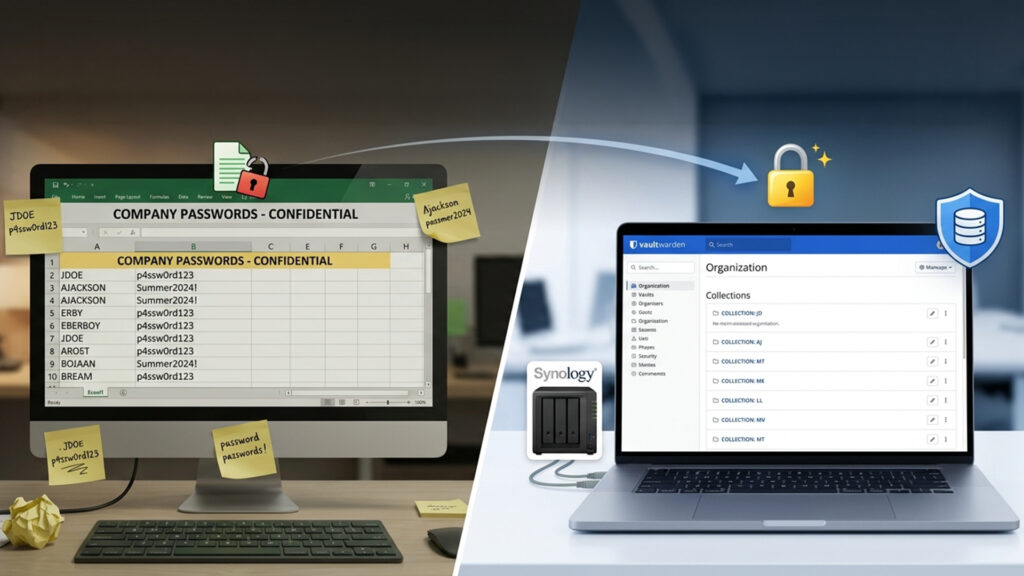
For a long time, all of that lived in one place. An Excel file on our internal file server, visible to anyone in the office who could open it. It worked, in the sense that people could find their passwords. It also meant that if that file leaked, or if the wrong person opened it, every single employee’s access to every system was exposed at once.
On top of that, our IT partners decided they’d start rotating everyone’s VM passwords every 90 days. And these aren’t passwords anyone could realistically remember. Long, random, machine generated strings you’d never type correctly twice in a row.
I knew this needed to change. Here’s the whole journey, the decisions, the dead ends, and the actual setup guide, in case you’re facing the same problem.

Step 1: Figuring Out What “Better” Actually Meant, and Choosing Vaultwarden
Before jumping to a solution, I looked into the general options for handling this kind of sensitive data distribution. Encrypted secret links, password protected zip files sent through separate channels, even just physically handing out printed slips. All of them technically work, but none of them scale. You can’t hand deliver a password every time someone needs one, and you can’t manually re-encrypt an Excel file every 90 days for 25 people without eventually making a mistake. I also briefly considered KeePass, since it’s free and simple, but it’s all or nothing. If you have the master password to the file, you see everything in it, with no way to say “this person only sees their own passwords.”
What kept coming back as the real fix was a proper password manager. Something with per user access control, audit logs, and a UI good enough that non technical colleagues would actually use it instead of writing passwords on sticky notes. We already had a Synology NAS sitting in the office, and Synology supports Docker through Container Manager, which made Vaultwarden, a lightweight, self hosted, Bitwarden compatible server, the obvious choice. It unlocks organization features, collections, and granular permissions, all running entirely on our own hardware. No cloud, no third party holding our credentials.
The pitch to myself was simple. Everyone gets their own login and their own master password. I create a “Collection” per employee, drop their specific VM and software credentials into it, and share it with only them. If someone leaves the company, I remove their access in one click. If new passwords come in, I update one entry and it’s instantly live for that person. They never even see the change happen.
Step 2: The Actual Setup (Guide)
If you want to do this yourself on a Synology NAS, here’s the real path, including the parts that weren’t obvious.
Install Container Manager and prepare a folder
1. Install Container Manager from Package Center if it isn’t already there.
2. In File Station, create a folder like /docker/vaultwarden. This is where your database will physically live. It needs to survive container restarts and updates.
Deploy the Vaultwarden container
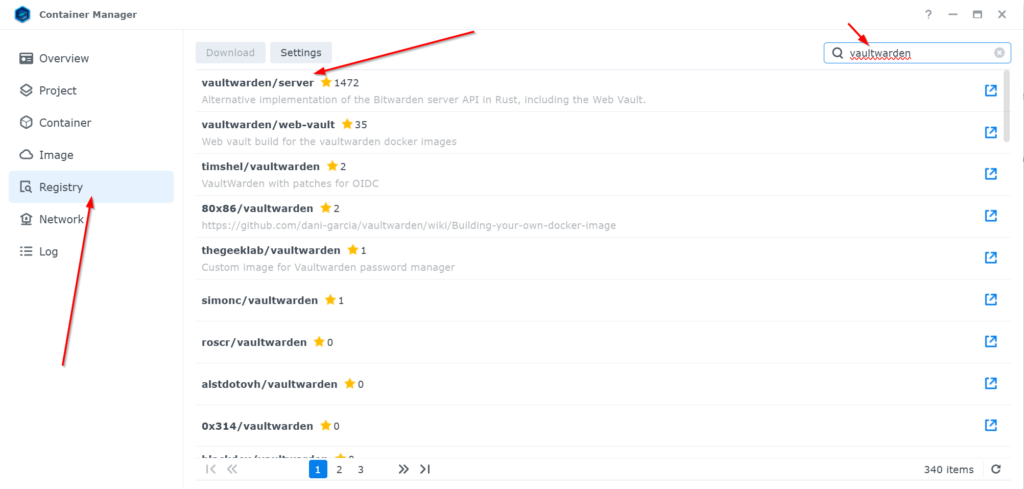
1. In Container Manager, go to Registry and search for vaultwarden/server. Download the latest tag.
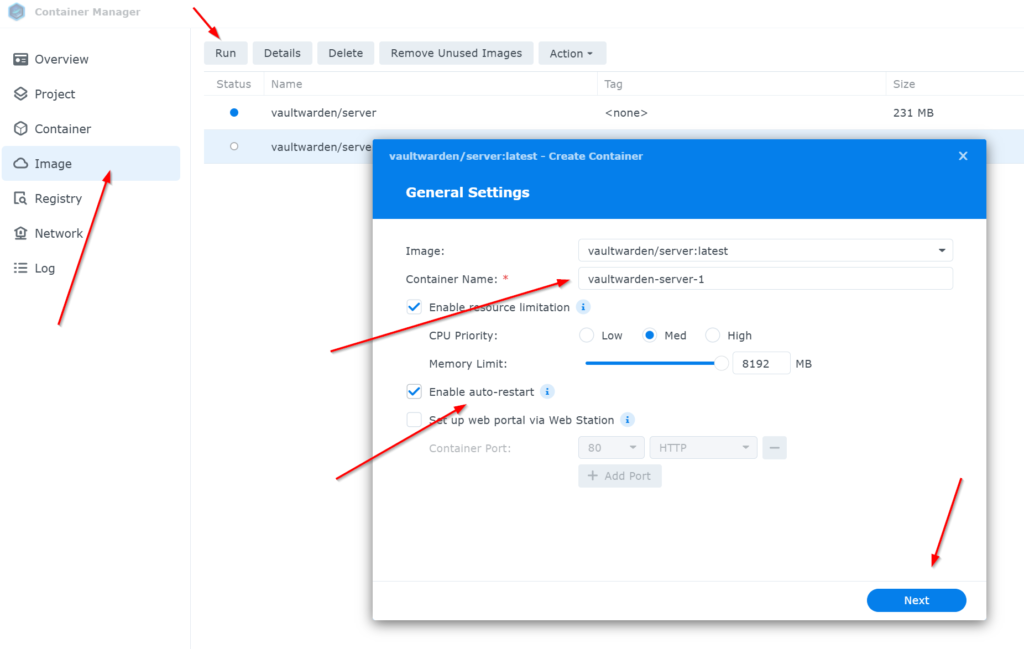
2. Go to Image, select it, and click Run.
3. Name the container, and enable auto restart so it comes back online after a power cut or reboot.
4. Under Advanced Settings:
- Port Settings: Local Port
8080to Container Port80(TCP). - Volume Settings: Add the
/docker/vaultwardenfolder and mount it to/data. This step is critical. Skip it and your data vanishes the next time the container updates. - Environment Variables: Add
SIGNUPS_ALLOWED = true(you’ll flip this tofalseonce your team is onboarded) andADMIN_TOKEN = [a strong secret](this unlocks a hidden/adminpanel for managing users).
5. Finish the wizard and confirm the container shows a green “Running” status.
Getting HTTPS working without exposing anything to the internet
Vaultwarden refuses to run properly without HTTPS. Browsers block the encryption features on a plain HTTP connection. If you don’t want a public domain or DDNS, here’s the workaround, keeping everything strictly internal:
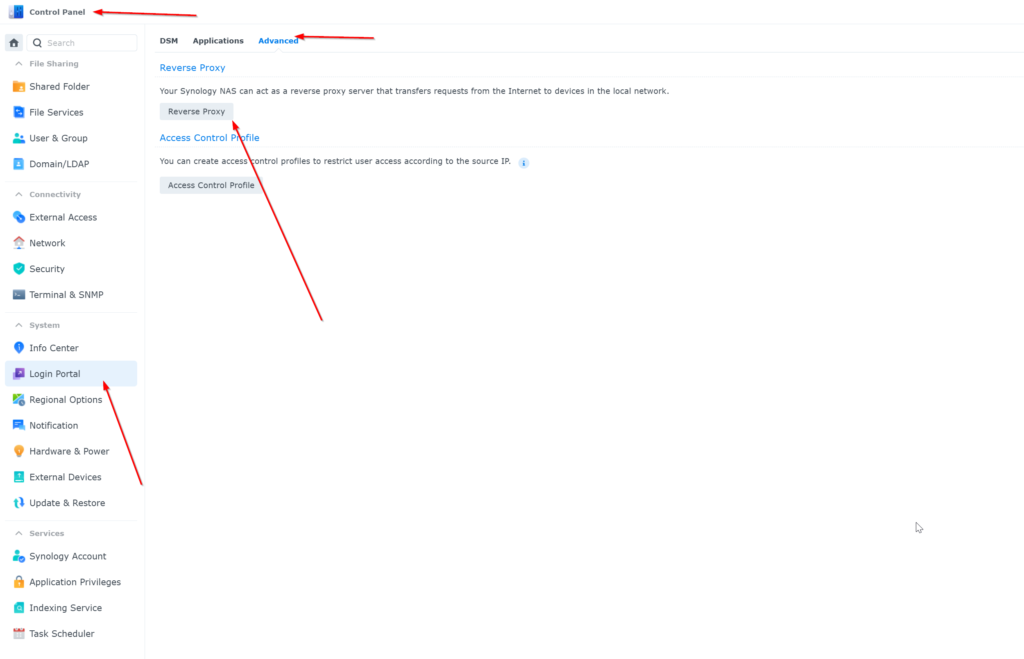
1. Go to Control Panel, then Login Portal, then Advanced, then Reverse Proxy, and create a new rule:
- Source: HTTPS, Hostname
*, Port8443 - Destination: HTTP, Hostname
localhost, Port8080(matching the local port from the container). - Under Custom Header, add a WebSocket entry so live sync doesn’t freeze.
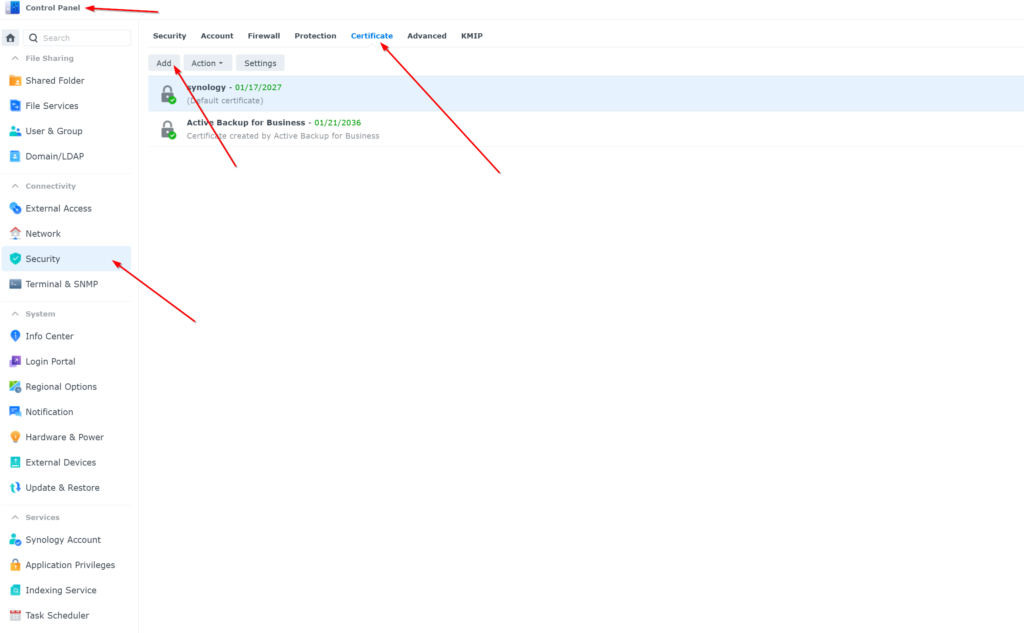
2. Go to Control Panel, then Security, then Certificate, then Settings, find your new reverse proxy entry, and assign it your existing Synology certificate (a self signed one works fine for internal use).
3. Access the vault at https://[your NAS IP]:8443. Your browser will throw a privacy warning because the certificate isn’t from a public authority. Click through it (Advanced, then Proceed). That’s expected and safe on an internal network.
Making it reachable over VPN
This is the part almost nobody warns you about. If your team also needs to reach the vault while connected through a VPN client, whether that’s someone working from home or another office reaching in through a site to site tunnel, getting the local network working is only half the job. Synology treats VPN traffic as coming from a completely different, “unknown” subnet, and by default it just drops it.
Here’s what actually gets it working:
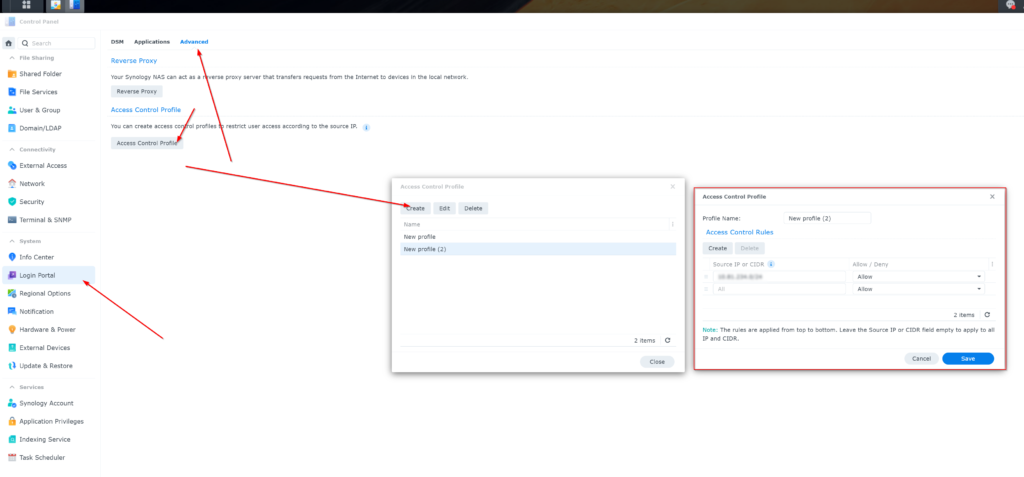
1. Check the Access Control Profile. In Control Panel, then Login Portal, then Advanced, find Access Control Profile. If one is applied to your reverse proxy rule, it might only allow your local office subnet. Add the VPN’s IP range as an allowed entry (for example 10.x.x.0/24, whatever range your VPN hands out to clients), positioned above any “deny all” rule.
2. Add the VPN range as a Trusted Proxy. Still under Login Portal, then Advanced, look for Trusted Proxy and add the same VPN subnet there. Without this, Synology can treat the incoming reverse proxy traffic as coming from an untrusted external proxy and block it outright.
3. Check the Synology Firewall rules. Under Control Panel, then Security, then Firewall, make sure there’s a rule allowing the VPN subnet, and that it sits above any rule denying everything else. Rule order matters here.
4. Verify the Default Gateway. Under Control Panel, then Network, then General, the NAS needs its Default Gateway pointed at your router. If it’s missing or wrong, the NAS receives the request from the VPN client but has no idea how to route the reply back, and the connection just times out silently.
5. Test with a simple port check from a machine connected to the VPN, using something like Test-NetConnection [NAS IP] -Port 8443 in PowerShell. If it comes back false, you’re still dealing with a firewall or routing rule somewhere in the chain above. If it comes back true, and the vault still won’t load, the problem has moved to the browser (try an incognito window to rule out a cached certificate error).
It’s a bit of a chase, since a VPN client and a site to site tunnel between two offices don’t behave identically, but the checklist above covers the actual culprits in order of likelihood: access control, trusted proxy, firewall rule order, and gateway configuration.
Step 3: Structuring Access. Collections, Not One Shared Vault
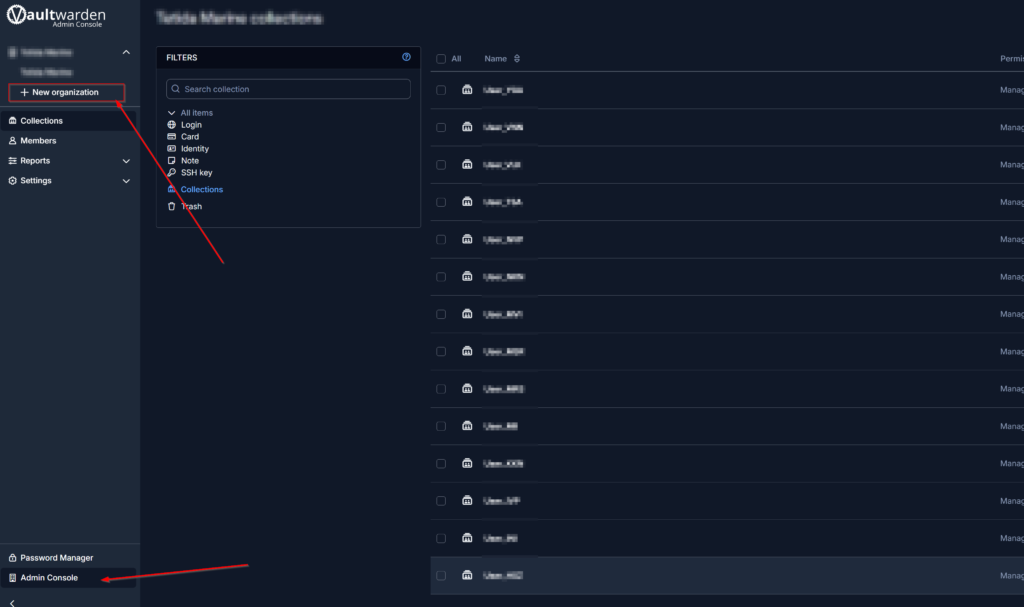
This was the part that made the whole thing worth doing. Instead of one shared list everyone can see, Vaultwarden’s Organizations and Collections let you build actual per person access:
1. Create an Organization for the company.
2. Create a Collection for each employee (I used their initials).
3. Drop that person’s unique VM and software credentials into their collection.
4. Invite them via email. They set their own master password, following the same secure format I rolled out for the new VM passwords, and only ever see their own collection.
The advantage over department wide sharing is that every employee’s VM credentials are genuinely unique. A collection per person meant I could update, revoke, or rotate any single person’s access without touching anyone else’s.
I also set permissions to “Hide Password” on these entries where it made sense. Employees can still use the credential to log in (copy, paste, or autofill), but they can’t see the raw password itself. It keeps things from ending up on a sticky note.
Step 4: The 90 Day Rotation Problem
Since the credentials live in Organization Collections rather than individual personal vaults, updating them is trivial. When new passwords come in, I open the relevant collection, edit the entry, paste the new password, save. The employee never has to do anything. The next time they click “copy” or “autofill,” the new password is already there.
Step 5: New Passwords, New Format
While setting this up, it also felt like the right moment to move everyone onto a stronger password format in general, not just for the VMs, but eventually for their actual Windows logins too. I settled on a simple, memorable syntax. Two words joined together, followed by a number and a special character at the end. Long enough to be genuinely hard to crack, but readable enough that people can actually type it without staring at the screen.
The rollout plan was gradual. Start people on Vaultwarden with this new password style, let them get comfortable using it daily through autofill, and once it’s second nature, switch their actual computer login to match. That way there’s only ever one password to remember, and by the time it becomes their Windows password too, they’ve already been typing it for weeks.
Where It Stands Now
Twenty five people, each with their own Vaultwarden account and their own isolated collection of credentials. No more shared Excel file. No more hunting for who has the current password. When the next rotation comes, it’s a five minute job on my end instead of a company wide scramble.
It’s not a flashy project, but it’s the kind of thing that quietly removes a recurring headache, for me and for everyone who used to dig through a spreadsheet just to start their day.